


PRO
手写 RPC 教程
基于 Spring + Netty + Zookeeper + Protostuff 从零开始设计实现一个轻量级分布式 RPC 框架,内含详细设计思路以及开发教程,通过造轮子的方式来学习,深入理解 RPC 框架的底层原理。相比简历上一律的 xxxx 系统,造轮子很显然更能赢得面试官的青睐
@[toc]
---
## 项目概述
本项目基于 Spring + Netty + Zookeeper + Protostuff 从零开始设计实现一个**轻量级分布式 RPC 框架**,内含详细设计思路以及开发教程,**通过造轮子的方式来学习**,深入理解 RPC 框架的底层原理。相比简历上一律的 xxxx 系统,造轮子很显然更能赢得面试官的青睐
当然,大家在实际项目中少造轮子,尽量去用现成的优秀框架
项目源码地址:
- Github:[https://github.com/Veal98/RPC-FromScratch](https://github.com/Veal98/RPC-FromScratch)
- Gitee:[https://gitee.com/veal98/RPC-FromScratch](https://gitee.com/veal98/RPC-FromScratch)
学习本项目,你需要下面这些技术储备:
- **Java 基础**
- 动态代理机制
- Java I/O 系统
- 序列化机制以及序列化框架(Kryo ......)的基本使用
- Java 网络编程(Socket 编程)
- Java 并发/多线程
- Java 反射
- Java 注解
- ..........
- **Netty 4.x**:使 NIO 编程更加容易,屏蔽了 Java 底层的 NIO 细节
- **Zookeeper**:提供服务注册与发现功能,开发分布式系统的必备选择,具备天生的集群能力
- **Spring**:最强大的依赖注入框架,业界的权威标准
## 功能列表
- [x] 使用 Spring 提供依赖注入与参数配置
- [x] 使用 Netty 进行网络传输
- [x] 基于开源的序列化框架 Protostuff 实现消息对象的序列化/反序列化
- [ ] **可优化**:用户通过配置文件指定序列化方式,避免硬编码
- [x] 自定义编解码器
- [x] TCP 心跳机制
- [ ] **可优化**:自定义应用层的 Netty 心跳机制
- [x] 使用 JDK/CGLIB 动态代理机制调用远程方法
- [x] 使用 Zookeeper(ZkClient 客户端)实现服务注册和发现
- [ ] **可优化**:基于 SPI 机制使得用户可以通过配置文件指定注册与发现中心的实现方式,避免硬编码
- [x] 客户端调用远程服务的时候进行负载均衡 :调用服务的时候,从很多服务地址中根据相应的负载均衡策略选取一个服务地址。目前使用的策略为随机负载均衡
- [ ] **可优化**:支持多种负载均衡策略
## 模块概览
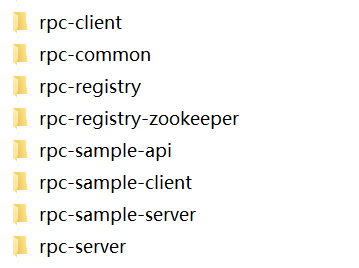
**本框架的核心功能模块**:
- `rpc-common`:包含封装 <u>RPC 请求与响应</u>(网络传输)的实体类/消息体 `entity`,Netty 编解码器 `codec` 以及序列化/反序列 `serialize`
- `rpc-server`:Netty / RPC 服务端,处理并响应客户端的请求 / 消息体)
- `rpc-client`:Netty / RPC 客户端,向服务端发送请求 / 消息体 + 接收服务端的响应
- `rpc-registry`:定义服务注册与发现行为的接口
- `rpc-registry-zookeeper`:基于 Zookeeper 及其客户端 ZkClient 实现服务的注册与发现
**下述这三个模块展示了如何使用本框架**:
- `rpc-sample-api`:定义服务接口(RPC 接口)
- `rpc-sample-server`:实现服务接口(RPC 接口),启动 / 发布 RPC 服务
- `rpc-sample-client`:调用 RPC 服务(使用动态代理调用远程方法)
## 使用说明
**框架的使用样例代码存放在 `rpc-sample-xxx` 包中**。
要想使用这个框架,我们需要该框架的服务注册组件和 RPC 服务器注入进服务端包 **rpc-sample-server** 中,将服务发现组件和 RPC 客户端(代理)注入进客户端 **rpc-sample-client** 包中,下面详细讲解一下本框架的基本使用 ⬇️
### 定义 RPC 接口
参见 **rpc-sample-api** 模块
```java
package com.cswiki.rpc.sample.api;
public interface HelloService {
String hello(String name);
}
```
**将该模块打成 jar 包供其他项目使用**,点击右边的 Maven 然后选择 **install** ,这样 jar 包就打好了:
<img src="https://gitee.com/veal98/images/raw/master/img/20201217170949.png" style="zoom:67%;" />
需要将 RPC 接口与 RPC 实现分别存放在不同的模块中
### 发布 RPC 服务
👉 参见 **rpc-sample-server** 模块
#### 添加依赖
```xml
<dependencies>
<!--RPC 接口所在模块的依赖-->
<dependency>
<groupId>com.cswiki</groupId>
<artifactId>rpc-sample-api</artifactId>
<version>1.0-SNAPSHOT</version>
</dependency>
<!--RPC 服务端框架的依赖-->
<dependency>
<groupId>com.cswiki</groupId>
<artifactId>rpc-server</artifactId>
<version>1.0-SNAPSHOT</version>
</dependency>
<!--注册中心所在模块的依赖-->
<dependency>
<groupId>com.cswiki</groupId>
<artifactId>rpc-registry-zookeeper</artifactId>
<version>1.0-SNAPSHOT</version>
</dependency>
<!--Spring-->
<dependency>
<groupId>org.springframework</groupId>
<artifactId>spring-context</artifactId>
<version>5.3.1</version>
<scope>compile</scope>
</dependency>
</dependencies>
```
#### 实现 RPC 接口
实现该接口:
```java
@RpcService(HelloService.class) // 指定暴露服务的接口类型
public class HelloServiceImple implements HelloService {
@Override
public String hello(String name) {
return "Hello! " + name;
}
}
```
使用 `RpcService` 注解定义在服务接口的实现类上表示暴露该服务
若 RPC 接口拥有多个实现类,则需要在 RpcService 注解中指定 version 属性加以区分
```java
/**
* HelloService 接口实现类 2(暴露该服务,需要指明 version)
*/
@RpcService(value = HelloService.class, version = "helloServiceImpl2") // 指定暴露服务的接口类型和版本
public class HelloServiceImpl2 implements HelloService {
@Override
public String hello(String name) {
return "Hello! " + name + ", I am helloServiceImpl2";
}
}
```
#### 配置 RPC 服务端
##### spring.xml
通过 Spring 注册相关组件:**sping.xml**
```xml
<?xml version="1.0" encoding="UTF-8"?>
<beans xmlns="http://www.springframework.org/schema/beans"
xmlns:xsi="http://www.w3.org/2001/XMLSchema-instance"
xmlns:context="http://www.springframework.org/schema/context"
xsi:schemaLocation="http://www.springframework.org/schema/beans
http://www.springframework.org/schema/beans/spring-beans.xsd
http://www.springframework.org/schema/context
http://www.springframework.org/schema/context/spring-context.xsd">
<!--对 rpc.sample.server 这个包进行扫描,也就是说在这个包中去寻找客户端请求的方法-->
<context:component-scan base-package="com.cswiki.rpc.sample.server"></context:component-scan>
<!--服务器配置参数-->
<context:property-placeholder location="classpath:rpc.properties"></context:property-placeholder>
<!--配置服务注册组件 Zookeeper, 需提供 ZooKeeper 地址、系统名、实例号-->
<bean id = "serviceRegistry" class="com.cswiki.rpc.registry.zookeeper.ZooKeeperServiceRegistry">
<constructor-arg name="zkAddress" value="${rpc.registry_address}"></constructor-arg>
</bean>
<!--配置 RPC 服务器, 用于发布 RPC 服务,需要提供服务器端口-->
<bean id = "rpcServer" class="com.cswiki.rpc.server.RpcServer">
<!--服务地址 127.0.0.1:8000-->
<constructor-arg name = "serviceAddress" value="${rpc.service_address}"></constructor-arg>
<!--注册中心地址 127.0.0.1:2181-->
<constructor-arg name= "serviceRegistry" ref = "serviceRegistry"></constructor-arg>
</bean>
</beans>
```
- `serviceRegistry`:用于服务注册(使用 ZooKeeper 实现),需提供 ZooKeeper 地址、系统名、实例号
注册到 ZooKeeper 中的 ZNode 路径为:`registry/service/address`,前 2 个节点是持久的,最后 1 个节点是临时的
- `rpcServer`:用于发布 RPC 服务,需要提供服务器端口
##### rpc.properties
以下配置表明:连接本地的 ZooKeeper 服务器,并在 8000 端口上发布 RPC 服务
```properties
# ZooKeeper 服务器(注册中心)
rpc.registry_address = 127.0.0.1:2181
# RPC 服务端
rpc.service_address = 127.0.0.1:8000
```
#### 启动/发布 RPC 服务
运行 `RpcBootstrap` 类,将对外发布 RPC 服务,同时进行服务注册(其实就是加载 Spring 配置文件)
```java
package com.cswiki.rpc.sample.server;
import org.springframework.context.support.ClassPathXmlApplicationContext;
/**
* 启动服务器并发布服务(其实就是加载 spring 配置文件)
*/
public class RpcBootstrap {
public static void main(String[] args) {
// 加载 Spring 配置文件
new ClassPathXmlApplicationContext("spring.xml");
}
}
```
### 调用 RPC 服务
参见 **rpc-sample-client** 模块
#### 添加依赖
```xml
<dependencies>
<!--RPC 客户端框架的依赖-->
<dependency>
<groupId>com.cswiki</groupId>
<artifactId>rpc-client</artifactId>
<version>1.0-SNAPSHOT</version>
<scope>compile</scope>
</dependency>
<!--RPC 接口所在模块的依赖-->
<dependency>
<groupId>com.cswiki</groupId>
<artifactId>rpc-sample-api</artifactId>
<version>1.0-SNAPSHOT</version>
<scope>compile</scope>
</dependency>
<!--注册中心所在模块的依赖-->
<dependency>
<groupId>com.cswiki</groupId>
<artifactId>rpc-registry-zookeeper</artifactId>
<version>1.0-SNAPSHOT</version>
<scope>compile</scope>
</dependency>
<!--Spring-->
<dependency>
<groupId>org.springframework</groupId>
<artifactId>spring-context</artifactId>
<version>5.3.1</version>
<scope>compile</scope>
</dependency>
</dependencies>
```
#### 配置 RPC 客户端
##### spring.xml
```xml
<?xml version="1.0" encoding="UTF-8"?>
<beans xmlns="http://www.springframework.org/schema/beans"
xmlns:xsi="http://www.w3.org/2001/XMLSchema-instance"
xmlns:context="http://www.springframework.org/schema/context"
xsi:schemaLocation="http://www.springframework.org/schema/beans
http://www.springframework.org/schema/beans/spring-beans.xsd
http://www.springframework.org/schema/context
http://www.springframework.org/schema/context/spring-context.xsd">
<context:property-placeholder location="classpath:rpc.properties"/>
<bean id="serviceDiscovery" class="com.cswiki.rpc.registry.zookeeper.ZooKeeperServiceDiscovery">
<constructor-arg name="zkAddress" value="${rpc.registry_address}"/>
</bean>
<bean id="rpcProxy" class="com.cswiki.rpc.client.RpcProxy">
<constructor-arg name="serviceDiscovery" ref="serviceDiscovery"/>
</bean>
</beans>
```
- `serviceDiscovery`:用于服务发现(使用 ZooKeeper 实现),需提供 ZooKeeper 地址
- `rpcProxy`:用于获取 RPC 代理接口
##### rpc.properties
```properties
# ZooKeeper 服务器的地址(IP 地址与端口)
rpc.registry_address=127.0.0.1:2181
```
#### 调用 RPC 服务
```java
package com.cswiki.rpc.sample.client;
import com.cswiki.rpc.client.RpcProxy;
import com.cswiki.rpc.sample.api.HelloService;
import org.springframework.context.ApplicationContext;
import org.springframework.context.support.ClassPathXmlApplicationContext;
public class HelloClient {
public static void main(String[] args) throws Exception {
// 加载 Spring 配置文件
ApplicationContext context = new ClassPathXmlApplicationContext("spring.xml");
// 获取 RpcProxy 动态代理对象
RpcProxy rpcProxy = context.getBean(RpcProxy.class);
/**
* 测试 HelloService 接口的实现类 1
*/
// 调用 RpcProxy 对象的 create 方法来创建 RPC 代理接口
HelloService helloService = rpcProxy.create(HelloService.class);
// 调用 RPC 代理接口的方法(调用远程接口方法就像调用本地方法一样简单)
String result = helloService.hello("World");
System.out.println(result);
/**
* 测试 HelloService 接口的实现类 2
*/
HelloService helloServiceImpl2 = rpcProxy.create(HelloService.class, "helloServiceImpl2");
String result2 = helloServiceImpl2.hello("Java");
System.out.println(result2);
System.exit(0);
}
}
```